
Hey everyone! Today, in this blog, we’ll learn how to install Laravel Breeze Package in Laravel 11, step by step. If you’re new to laravel development or web development, don’t worry. By the end of this blog, you’ll know exactly how to install this package and you will learn how to use this package. ok let’s start right in!
if you want to see my previous blog post please visit How to Install React with Node using npx: 5 Step Guide.
Laravel Introduction
Laravel 11 is most popular web application framework with expressive, elegant syntax. A web framework provides a starting point for creating you application, allowing you to focus on creating something amazing while we sweat the details.
Laravel strives to provide an amazing developer experience while providing powerful features such as thorough dependency injection, an expressive database abstraction layer, queues and scheduled jobs, unit and integration testing, and more.
Whether you are new to PHP web frameworks or have years of experience, Laravel is a framework that can grow with you. We’ll help you take your first steps as a web developer or give you a boost as you take your expertise to the next level. We can’t wait to see what you build. sourced by www.laravel.com
if you want learn more about Laravel 11 please refer official laravel documentation
Understanding Laravel Breeze
Laravel Breeze is a minimalist starter kit for Laravel 11 applications, it is specifically designed to provide simple and easy-to-use authentication scaffolding.
It offers a quick and efficient way to set up login or authentication features such as user registration, login, and password reset without the complexity of Laravel Jetstream or Laravel UI.
Features of Laravel Breeze
- Simplified Authentication: Laravel Breeze provides a straightforward approach to implementing authentication, making it ideal for small to medium-sized projects.
- Lightweight and Minimalist: Unlike Laravel Jetstream, which comes with additional features like team management and two-factor authentication, Laravel Breeze focuses solely on authentication, resulting in a lighter footprint for your project.
- Tailwind CSS Integration: Laravel Breeze integrates seamlessly with Tailwind CSS, a utility-first CSS framework, allowing for easy customization of the user interface without sacrificing performance.
Prerequisites
Before diving into the installation process of Laravel Breeze, ensure that you meet the following prerequisites:
- A basic understanding of the Laravel ecosystem, including Composer and artisan commands.
- A development environment set up with PHP, Composer, and a database management system (e.g., MySQL, SQLite).
Table of Contents
Set Up a New Laravel Project
Before installing the laravel project, make sure composer is installed on the system.
to check that composer is installed on the system using terminal
Type the following command in your terminal or command prompt
composer
if you get somthing like the image above, it means that composer is installed successfully.
To begin, create a new Laravel project using Composer type the following cmd in your terminal or command prompt
composer create-project --prefer-dist laravel/laravel my-projectyou can give any other name instead of my-project. after hit the enter btn installation process show like this


Finally you get Application installed successfully message above the image.
Installing Laravel Breeze
Once your Laravel project is set up, install Laravel Breeze via Composer:
cd my-projectcomposer require laravel/breeze --dev
Set up Database Connection .env file
APP_NAME=Laravel
APP_ENV=local
APP_KEY=base64:sOqmE0MvKaJYJWh2lWKtzO0jqm+MC5953yJfmud2sIQ=
APP_DEBUG=true
APP_TIMEZONE=UTC
APP_URL=http://localhost

APP_LOCALE=en
APP_FALLBACK_LOCALE=en
APP_FAKER_LOCALE=en_US

APP_MAINTENANCE_DRIVER=file
APP_MAINTENANCE_STORE=database

BCRYPT_ROUNDS=12

LOG_CHANNEL=stack
LOG_STACK=single
LOG_DEPRECATIONS_CHANNEL=null
LOG_LEVEL=debug

DB_CONNECTION=mysql
DB_HOST=127.0.0.1
DB_PORT=3306
DB_DATABASE=laravel_breeze
DB_USERNAME=root
DB_PASSWORD=

SESSION_DRIVER=database
SESSION_LIFETIME=120
SESSION_ENCRYPT=false
SESSION_PATH=/
SESSION_DOMAIN=null

BROADCAST_CONNECTION=log
FILESYSTEM_DISK=local
QUEUE_CONNECTION=database

CACHE_STORE=database
CACHE_PREFIX=

MEMCACHED_HOST=127.0.0.1

REDIS_CLIENT=phpredis
REDIS_HOST=127.0.0.1
REDIS_PASSWORD=null
REDIS_PORT=6379

MAIL_MAILER=log
MAIL_HOST=127.0.0.1
MAIL_PORT=2525
MAIL_USERNAME=null
MAIL_PASSWORD=null
MAIL_ENCRYPTION=null
MAIL_FROM_ADDRESS="hello@example.com"
MAIL_FROM_NAME="${APP_NAME}"

AWS_ACCESS_KEY_ID=
AWS_SECRET_ACCESS_KEY=
AWS_DEFAULT_REGION=us-east-1
AWS_BUCKET=
AWS_USE_PATH_STYLE_ENDPOINT=false

VITE_APP_NAME="${APP_NAME}"
After setting the database connetion as in the .env file. then going to next step
Breeze Install and Running Migration and Seeding
Next, run the breeze install, migration and seeding commands to set up the database schema and seed sample data:
php artisan breeze:install
After successful installation of breeze package. you will get a “Breeze scaffolding installed successfully” message.
php artisan migrate
php artisan db:seed
Next, run the migration command in your terminal
Starting the Development Server
Finally, start the Laravel development server to preview your application:
php artisan serveRun URL : http://localhost:8000
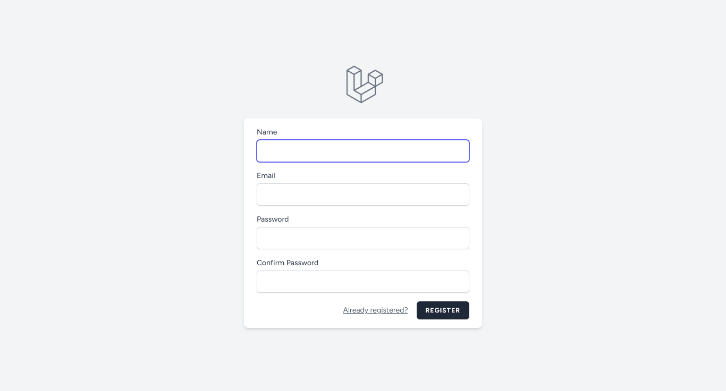
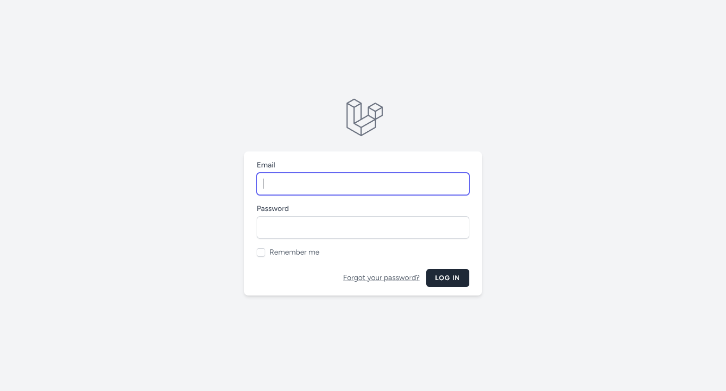
Login URL : http://localhost:8000/login
Register URL : http://localhost:8000/register

Exploring Laravel Breeze Authentication
Default Authentication Routes
Laravel Breeze automatically generates authentication routes for login, registration, and password reset. These routes are defined in the routes/auth.php file and follow RESTful conventions.
Customization Options
While Laravel Breeze provides a default set of authentication views and routes, it also offers various customization options to tailor the authentication experience to your project’s requirements:
- Views and Layouts: Customize the authentication views by modifying the Blade templates located in the
resources/views/authdirectory. - Route Customization: Override the default authentication routes or add additional routes by editing the
routes/auth.phpfile. - Controller Override: Extend or replace the default authentication controllers to implement custom logic or integrate with third-party services.
Conclusion
In conclusion, Laravel Breeze offers a lightweight and efficient solution for adding authentication to Laravel applications. By following the installation steps outlined in this article and exploring the customization options available, developers can quickly set up authentication functionality tailored to their project’s needs. For further resources and advanced Laravel development techniques, refer to the Laravel documentation and community forums. Happy coding!